DPS Meter
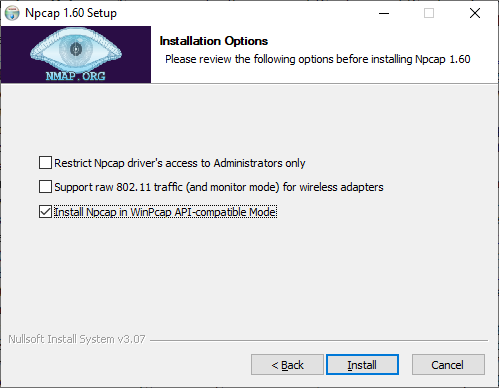
Npcap needs to be downloaded and installed separately. It's required component. DPS meter won't work without Npcap.
Join our discord if you have any questions, problems, suggestions.
Support MyAion
We're entering a new year with MyAion. We've been with you since April 2019. It's been over six years of a wonderful journey with the project. To keep it going for another year, we're humbly asking for your help to cover the project's costs. Can we do it?
You can support MyAion on our website: https://myaion.eu/Donate
Requirements:
-
must be installed separately:
- Npcap 1.86 (check 'Install Npcap in Winpcap API-compatible Mode' during installation)
- other dependencies installed together with MyAion DPS Meter:
Installation and Configuration:
-
Install Npcap with checked option 'Install Npcap in Winpcap API-compatible Mode'

-
Launch DPS Meter before connecting to Game Server:
-
before logging in

-
or before selecting server

-
before logging in
-
Configure Network connection in application:
-
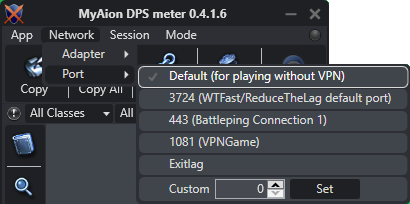
Check if you have selected correct adapter in Menu -> Network -> Adapter. If you are have multiple adapters and you are not sure which one you are using, you can check one by one.

-
If You are using VPN, set correct port in Menu -> Network -> Port (for example WFTast uses 3724 as default port, Battleping uses 443 port).

-
Check if you have selected correct adapter in Menu -> Network -> Adapter. If you are have multiple adapters and you are not sure which one you are using, you can check one by one.
-
Connect to Game Server / log in and check if connection has been estabilished:
-
If you can see green light in top right corner, it's ready to work.

- Otherwise something went wrong, please check Throubleshooting section below.
-
If you can see green light in top right corner, it's ready to work.
Troubleshooting:
If You cannot check Install Npcap in Winpcap API compatibility mode during installation of Npcap, try Kr0NiCk's solution:
"Not everything related to win10pcap was properly removed from the system. What you can do is install win10pcap again and use a third party uninstaller like "iobit uninstaller" and select "remove residual files". When you do it that will fix it. The 2nd option would be to go to "regedit" and remove leftover keys from win10pcap".
If You see in new version of app error like this: "Couldn't initialize device. Make sure that Npcap is installed without errors. Check 'Install Npcap in Winpcap API compatibility mode' during installation of Npcap.", it means that something is wrong Npcap installation.
Check if You have selected Install Npcap in Winpcap API compatibility mode during installation of Npcap.
If error still shows up, check if install.log file from catalog where You installed Npcap contains any errors.
VPN Compatibility:
In addition to the default connection, the MyAion DPS meter also works with the following VPNs:
In addition to the default connection, the MyAion DPS meter also works with the following VPNs:
-
WTFast:
- MyAion DPS Meter: select "WTFast / ReduceTheLag (port 3724)" in Network -> Port/VPN menu
-
VPNGame:
- MyAion DPS Meter: select "VPNGame (port 1081)" in Network -> Port/VPN menu
-
PingZapper:
- Npcap: Instal older version 0.9981 - check option: Support loopback traffic ("Npcap Loopback Adapter" will be created)
- MyAion DPS Meter: select "LookBack Driver" in Network -> Adapter Menu
-
NoPing:
-
Routing System Mode 1:
- MyAion DPS Meter: select "Default (no port tunneling)" in Network -> Port/VPN menu
-
Routing System Mode 2:
- Npcap: Instal older version 0.9981 - check option: Support loopback traffic ("Npcap Loopback Adapter" will be created)
- MyAion DPS Meter: select "LookBack Driver" in Network -> Adapter Menu
-
Routing System Mode 1:
-
Exitlag:
- MyAion DPS Meter: select "Exitlag (custom protocol)" in Network -> Port/VPN menu
-
Exitlag:
- Aion Connection Settings: Use only TCP Routes, set UDP and ICMP Routes to 0
- Tools Settings: Disable IPv6
-
ReduceTheLag:
- MyAion DPS Meter: select "WTFast / ReduceTheLag (port 3724)" in Network -> Port/VPN menu
- MUDFISH:
-
MyAion DPS Meter:
- select Network -> Adapter -> TAP-Win32 Adapter V9
- select Network -> Port/VPN:
- Default for disabled WFP Item Mode in Mudfish
- Mudfish - WFP Enabled (port 8085) for enabled WPF Item Mode in Mudfish
-
Mudfish:
- set Setup -> Program -> Connection Protocol: TCP
- set Setup -> Program -> RTT Checking Method: TCP
-
MyAion DPS Meter: